Tuesday, 19 April 2022

Mobile phone podcasts for listening practice

If you asked me, what is the area in my teaching that I wish I should be doing more than I have been doing, my answer would likely be the teaching of Listening.

Teaching listening in Mozambique is challenging and, from conversations I have had with some colleagues, it seems to be a common challenge in other African countries too. Among other factors, one that we often mention is insufficiency of resources, especially in public schools.

Finding alternatives that will not mean having a series of meetings to convince the institution to buy, for example, a TV set, or a speaker, can be the answer sometimes. Mobile phones seem like a good option, and I am glad to be discovering some interesting tools that I feel that I could use in my context. One of those tools is the British Council’s LearnEnglish Podcast, a mobile application for listening practice (with affordances for reading and language content too). The app is an affiliate of the LearnEnglish website that I wrote about in this post some weeks ago.

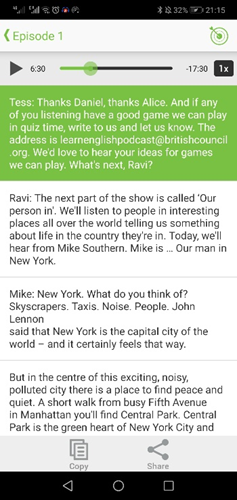
The LearnEnglish Podcast app, available on Google Play and App Store, features a series of podcasts that involve conversations and other types of talk on a variety of topics, allowing for different language skills and content to be addressed.

General features

  • Podcasts have four main components: talks in different scenarios; ‘lesson sections’; exercises; and 'rapport moments' (if I may call it so);
  • Content is presented in a radio program fashion (which reminds me of when I was a regular BBC World Service listener in my English learning journey);
  • ‘Programs’ are followed by a ‘lesson section’ that wraps up the main language used in the episode  and discusses some learning and studying strategies;
  • In-app exercises are available throughout the podcasts, so the learner can access them at their preference;

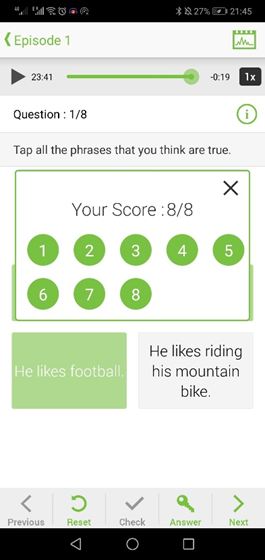
                     

  • The rapport happens throughout the podcasts where listeners are invited into the conversation and asked to follow up, by e-mail, to give suggestions, or to have their say on the matters discussed in the podcast.   


A more detailed description of the features can be found here.  

Skills and language areas covered

  • Listening
  • Pronunciation
  • Reading
  • Spelling
  • Vocabulary


Affordances

Episodes are different, but below I share some of the main pedagogical potential of the LearnEnglish podcasts. You can have a look at a sample episode here (link available through mobile app).

  • Collaboration: in a sense, when listeners are asked to feedback on the podcasts by sending emails, they are participating and being included in the design of the course;         
  • Authenticity: most talks are about real-life situations, and the ‘radio program’ format might sometimes be so entertaining that students forget they are on a language learning activity (I had this feeling when listening to some episodes);
  • Learner training: In Episode 1, the ‘teacher’ in the language focus section talked about some vocabulary learning techniques, inviting learners to think about their learning and learning styles and encouraging them to explore the techniques which work best for them; 

  • Culture: being authentic material, language content often comes with some facts about people and places, and things in general, making it, in my opinion, more enjoyable;
  • Variety of accents: different accents are included, sometimes with a clue of where it might be from. I find this particularly important as it reduces the pressure from learners to speak in a single accent;
  • Exposure, exposure, and more exposure: what I like most about the app is how much listening exposure students can get and the subsequent opportunities to practise reading, spelling, vocabulary, and pronunciation.


Classroom use ideas

Listening material

The podcasts are listening material on their own. The fact that they are downloadable allows the teacher to use then for a variety of activities:

  • Students can be invited to do the activities in the podcast;
  • The teacher can design their own activities using the talks as reference;
  • With a Bluetooth speaker, the teacher can play the podcasts from their mobile in the classroom, if students cannot afford the app;
  • If students can afford the app, the teacher can set self-study tasks.

Teaching tips

  • The activities in the podcasts can be a source of inspiration for teachers to design their own activities. 


Things I wish were different…

  • That some stereotypes were not perpetuated. For example, in one of the episodes  (link only available through mobile app) the following subtle stereotypes can be deduced from the talks: ‘women cannot tell their age’ ‘men love football’, ‘women are good for their looks’, ‘Africa as the face of poverty’;
  • I wish Sharing options included more platforms;
  • I wish there were no adds…but I guess this could be a little too much to ask from a free app;


There are many podcasts on the app and I believe that every episode will have something interesting to a teacher depending on their needs and teaching circumstances. If you decide to have a try, please share  in the comments some of the things you find more interesting.
Also share any other mobile apps you know of, that are good for teaching.

Thank you for reading. :)

See you,

Cândida


Credits: images are screenshots of pages in the LearnEnglish Podcast app. 

TED, YouTube, and Teaching

Hello!

It has been a while since I last posted (I missed you!)

Work has kept me busy, and I did not get enough focus to write, but during this time away I learned about an interesting tool, TED-Ed. I thought TED was only about talks but it turns out they have a platform that helps teachers create lessons using YouTube videos, or TED talks for that matter. So, today’s post will be about how to use TED-Ed to create online lessons based on YouTube videos.

TED-Ed has a simple interface, with a simple structure, containing four main buttons: Discover, Create, Get Involved and Support. 


The Discover bottom is a repository of lessons and ideas from other creator; Create is the space where, as a teacher you can create your own lessons. Get involved allows users to create ted talks and Support is more about the commercial part.

For the purposes of this post, I am going to focus on the Create section where lessons are created. Lessons can happen within the application, where students type in their answers and comments, or it can be used as an aid in a live online or face-to-face lesson.

Before you start creating, first you will need to register. For this you can either create an account or, you can log in using your Google or Facebook account. Once signed in, there is a form where you specify the type of user you will be, in this case teacher and more specific information will be asked, relating to level and subject areas in which you teach.


Creating a lesson

It might be helpful that you have your notes about your lesson before starting, i.e., the lesson outline including the steps, activities, and the video you plan to use. With that in place, and once your sign in has been validated, you can start creating your lessons by following the steps described below.

  1. By clicking on ‘Create’, you will get the window below where you can either type in a key word to let the site search for videos, or you can type in or paste link to the YouTube video you want to use.  

  2. After you type in a YouTube URL, you will get the result displayed and you can then continue building your lesson, by clicking on the video. From now on I will be showing screenshots of a lesson I built while learning to use platform. The lesson is designed for a teacher training class, and is available at  https://ed.ted.com/on/Y8MFDnTL.  

    When you click on the video, you get the window below, with a short description of the video and a ‘Continue’ button.  

  3. When you click ‘Continue’ you get the page seen in the image below, where the stages of the lesson are represented in the headings, ‘Lesson title’, ‘Let’s Begin’, ‘Think’, ‘Dig Deeper’, ‘Discuss’, and ‘And Finally…’. You only need to fill in those spaces, based on how you planned the lesson, where Let’s Begin would be the start and ‘And Finally…’ the end. 

  4. You are now ready to publish. But first you might want to check that everything is fine before doing it, and for that you click on the ‘More’ button and you will be able to see the list below. 


    I should also mention that you have the option to crop a video, in case you will not need the whole of it in your lesson. 

  5. After making sure that it is ready, you then click on the publish button (see first picture in number 5 above), which take you to the window below showing different sharing options, including e-mail, social media, or link text. 

  6. After sharing, you can go back to the main page, and you will be able to see the lesson listed. 


    Below is what the lesson front page looks like when opened. We can see lesson title, the introduction, and the lesson stages on the right-hand side through which participants can navigate. 

Affordances

  • Flexibility: students can join at the time they find most convenient, choose the parts to which they want to pay attention, using the divide they have available.
  • Autonomy: students work independently either individually or in groups, to reflect on the video content
  • Digital skills: the use of video and the tools engages students into practising their digital skills
  • Listening practice: by watching a video, students are exposed to language in use
  • Writing and speaking practice: students practise writing and speaking when reacting to or building upon ideas from video content.
  • Authenticity: you tube videos are a great way of exposing students to language in use in daily life, in a variety of contexts

Advantages

  • TED-Ed is very practical for blended learning, as lessons can be prepared in advance or and students can access them at their convenience;
  • I particularly like the design. Simple and organized in lesson plan style where at each stage you see the lesson unfolding;
  • Students do not need to create an account, especially if you do not plan to use it frequently.
  • Videos can be cropped allowing you to choose the parts that are mot useful to your lesson;
  • User friendly, both PC and mobile phone compatible. See the screenshots below for an illustration of mobile version views. 


Things I would have wanted to see…

  • The fixed layout does not allow for different lessons formats. While there is nothing wrong with the order of activities, I would have loved to see the tool allow for repositioning of activities. For example, in the sample lesson above, I do now want students to watch the video right away as the first activity, but unfortunately, I could not move it to the position I wanted, which would have to be after the ‘Think’ stage; 

  • I wish there was a space where, if one chose to have a synchronous lesson, one could schedule the lesson for a specific time.


Despite the drawbacks I mentioned, TED-Ed is a tool I would recommend.


Thank you for reading. 😊

See you,

Cândida


Credits: All images in this post are screenshots of my activity as an individual user on TED-Ed, at https://ed.ted.com/educator

Friday, 4 March 2022

Speaking with Speechling

Among the numerous language learning and teaching technology tools available today, you might have noticed that many of those do not give a lot of attention to Speaking, or more specifically to Fluency. This could in part be associated with the fact that audio input processing requires more memory than text, for example, in addition to practicality issues related to assessing fluency as it happens with remote teaching and assessment of Speaking.

However, there are tools that challenge this and attempt to provide the necessary affordances for the practice of speaking. Examples of those are YouGlish, Flipgrid, Videomail, and Tellagami, but in this post I will talk about Speechling.

Speechling is a tool that allows learners to practise Speaking - pronunciation and fluency - through listening. It provides audio output for reference and enables learners to repeat after it as many times as they want while recording themselves.  After recording themselves, learners can compare their output to the models provided and they can also request feedback from a tutor assigned upon registration. An account is needed but learners can also join with a google or Facebook account.  


Different accents are available for learners to choose and the tool has a translation feature that allows for the vocabulary, phrase or sentence being practised to be translated. These preferences can be set in the settings area.

Practice is not only limited to repeating over the models, but it is also possible to simulate a conversation where learners receive questions or prompts for them to respond to, a picture stimulus where they can describe it, and there is also the option of free talk where learners can say anything they want.


The content is grouped into topics and levels where single words, phrases and sentences are available. Below are some pictures illustrating the content.


Speechling for individual accounts (because there is an Institution account option) is mainly to be used as a self study tool but as teachers we can use to aid our teaching, by either encouraging students to do some practice work on their own based on what they are most interested in improving or by asking them to do specific tasks that we identify. 

On a more critical note, as with every tool, there are some limitations with Speechling that you might want to consider if you decide to use it  which I discuss below:

  • In the translation feature, there are some inaccuracies which I believe are consequences artificial language, that can mislead learners. In the screenshot below, “what’s” is interpreted as “whats” (plural of “what”).


  • Another inaccuracy I found is that words are not translated in context. Literal translation is done, where the most common meaning is considered and it can confuse or mislead students from a language background that is different in structure from English, as is the case of Portuguese, for example. 

          
  • Only a few varieties of English are available, and because recordings are assessed in comparison to those varieties, being a computer system, it might judge learners with a different accent as wrong and also limit those learners who might have other interests based on their learning contexts and reasons for learning English. Maybe this issue is minimized through the tutor, who being a real person might provide more balanced feedback, but it is not apparent whether the choice of including such accents had to do with limitations in producing models in other varieties or if the tool is intentionally designed to cater for the needs of those interested in the varieties that have been included;
  • Unfortunately, while models are perceptible, they do not sound authentic.

Having looked at these limitations, I believe that with this tool the best role the teacher can take is that of a coach, by assisting students in their use of the tool, explaining the limitations ang sharing some tips. For example, advising students to have a dictionary and/or grammar book to complement their studies.

Despite these limitations I think that Speechling is a valuable tool with many affordances such as repetition, allowance for learners to make mistakes, opportunity for learners to hear their recording and compare to models, personalization, and a pressure free practice environment. These are important aspects that aid the process of learning which I believe are worthy of our investment.

Have a look at it and share what you think in the comments.

See you next week,


Cândida


Credits: Pictures included here are screenshots of pages from the  Speechling website at https://speechling.com/

Friday, 25 February 2022

Brainstorming and reaching consensus made easy

Today I want to share with you a simple but powerful online tool that enables students to share, discuss and decide on ideas.

It is called Tricider, and among other features, allows for online brainstorming and decision taking based on most voted ideas. Here is the access link: https://www.tricider.com/home

How it works

A person posts a question. This is available right on the home page  You just have to type your question and then click ‘Go’.


Others -and you too - give their ideas (Using the ‘Add idea’ button and then saving it.)


Present arguments for or against the ideas and then vote.

In their turn, voters can also present their own ideas and arguments and be voted.  A participant can also present an argument against an idea, which implicitly justifies  their not voting for it.


The tool does not require signing up from participants in the decision making. Participants can be invited through a link that can be sent via e-mail or social media,  or by copying and pasting it to any platform that reads text.


Simple, isn’t it?

Let’s now see how Tricider can help us in our teaching.

Tricider can be used for collaboration. More specifically, it can be used for tasks involving reaching consensus and decision making. Students can be presented with a situation on which they need to decide by everyone presenting their ideas and arguments to support them, followed by a discussion that is done by others supporting, presenting their counter arguments, or voting. The most voted idea becomes the decision.

For example, imagine that you planned a series of online presentations, and you want students to decide on the best day of the week and time for the presentations to take place. You can create the question on Tricider and share the link to the class WhatsApp group (or any other communication platform you use). See the example here.

It is important to give explicit instructions on what students are expected to do and include a short explanation on how to use the platform for that purpose.

For example, the task above it could be shared as this:

Hey all,

I would like to know when you think is the best day of the week and time for your presentations.

Please follow this link http://www.tricider.com/brainstorming/37vxMoJidQV  to share your ideas.

[While attaching a screenshot of the question page you could add the following explanation]

Click on “Add idea” to give your idea.

Click on “Add argument” to give your justification

Click on “vote” to support an idea that you like


To increase the likelihood of students’ participation I think it is important to set some rules. For example, that everyone should present an idea and either present an argument for their idea, or against someone else’s. Another aspect that might increase participation is that fact the decision to be taken be on a real matter. In this way students will be using language genuinely.

In this example the teacher is the one starting the discussion but in other instances you could encourage students to start their own questions.

Summary of advantages and affordances for learning

  • Allows for the practice of students' writing skills integrated with reading
  • Opportunity for students to improve their digital literacy skills
  • Simple interface, which is good for students and teachers who are beginners in the digital world;
  • Low data costs: unless one decides to add a picture or video, for a simple decision-making activity involving text the site does not involve heavy data processing;
  • No subscription needed: in some contexts, students do not have e-mail accounts and having a tool that does not require one is an advantage;
  • A good combination of language learning, collaboration, digital literacy skill, and autonomy.

Limitations

This is risky to write, but as long as there is Internet access available to students and teacher, I honestly cannot find a limitation with this tool. But this could just be from the context I am writing. What do you think? What are some of the limitations that you see in the tool? Please share in the comments.

Thank you for reading and see you next week!

Cândida

Saturday, 19 February 2022

Teach your students to fly…without you…

 "A teacher is one who makes himself progressively unnecessary." Thomas Carruthers

This quote seems to go against everything that we learned about the role of a teacher and what we perceive to be our identity as teachers. As teachers, most of us learned that our role is to guide, to show the way, to lead. This assumes that we know better than our students, that they need us to learn and thus, that we are of course necessary!

The roles we associate with our profession become part of our identity as teachers and when something appears to challenge their relevance it might feel like a part of our identity is being taken out, and we might ask ourselves what is left of our profession.

I found the quote while searching for quotes on learner autonomy. I did not agree with it when first read it, but it caught my attention for how provocative and bold it sounds and I thought there had to be more to it.

How can a teacher be unnecessary? Why would anyone even think that it necessary for a teacher to make themselves unnecessary? My answer would be, 'only if it proved good for my students’ learning', and started reflecting on how my progressively becoming unnecessary could mean something good for my students.

In today’s world, whether we feel comfortable about the idea or not, the truth is that there is much more knowledge and learning opportunities outside the classroom than inside. Looking specifically at English teaching, in some contexts limited time, lack of resources and class size are big constraints in creating practise opportunities in the classroom. It is not easy (I am avoiding the word impossible) to give practice opportunities and monitor the performance of 80 to 100 in a 45-to-90-minute English lesson. It seems reasonably that we should take advantage of other sources and modes of learning outside the classroom, and because we will not be there, we need to help our students to use those opportunities on their own. One way this can be achieved is through the use of technology, and among others, the British Council's LearnEnglish website seems like a good option.


LearnEnglish is a self-study English learning website for adult learners which contains various sessions tailored to different language levels, skills and needs. Some resources are paid but there are also good free resources which makes it a good alternative for low resourced contexts. Sessions include language input and exposure and there also production tasks that involve online discussions and downloadable worksheets for students to practise.


There is a page on the site where learners can test their English level preferably before starting using it to help them find the appropriate material. I find this particularly useful in EFL contexts where the CEFR framework is not used and students often cannot tell what is their English level making it sometimes difficult to choose the appropriate material.


As useful as the website is for English learning and in helping students become more autonomous, it is important to acknowledge that learner autonomy is still not a solid concept in some contexts where teachers are culturally expected to take control. Because students look upon teachers, in such contexts the change should start from the teacher; we should believe in autonomy ourselves and then guide our students into gradually becoming independent to the point of in some moments – yes – not needing us to learn.

Because LearnEnglish is designed for self-study and targeted to adult learners, we might wrongly think that students should learn and start to use it on their own. In my experience once trying a similar tool (BBC's Learning English ) I learned that in contexts where students expect the lead to be taken from the teacher, only recommending a tool and directing students to it is not enough. The result can be students visiting and not doing any task or not visiting it at all. I thus believe that teaching autonomy in such contexts should be a gradual process where students are shown the learning opportunity or tool, how useful it can be and then how they can use it on their own.

Here are some ideas on how you could use the LearnEnglish website:

  • Start with linking your lessons and the website. This can be done by designing an activity that requires the use of the website, one which can start in the classroom and progress to the website or vice versa. For example, in this Speaking session involving a discussion at the end, students could be invited to carry on the discuss in the classroom. This could be done in two or three lessons.


  • The next step could be students trying to make sense of the website features and say which parts or sessions they like most. They could refer to the activities that they have being doing or other parts of the website they find interesting. By this stage students will hopefully have developed some familiarity with the website and saw the connection with their learning;
  • The final step would be asking students to think of which language aspects they would like to improve, finding out their level by taking the online test on the website and making a study plan based on those. The potential in this is that they will have to reflect on their learning by identifying their needs and making independent decisions on what to learn.  This could be followed by sessions where they share what they have learned.

Some aspects to bear in mind:

  • As you might have inferred, the use of the website involves internet costs, and this is something you should think about when considering using it by making sure there are opportunities for students to access the Internet outside the classroom. This could be in your school, some public spaces, or their homes or workplaces;
  • Another thing, as mentioned earlier, is that autonomy is not a culture everywhere so be patient and supportive if students do not respond positively at first;
  • Be conscious that using the website means adding two more aspects to English learning. In addition to learning the language, students have to learn to use the website and learn to learn independently. Bear this in mind and make sure you create room for them to become familiar with the new components and be prepared to the possibility of one interfering with another at some point.

We certainly need to be aware of challenges but we should focus more on the opportunities. The website is a rich learning source and tool, an opportunity to practise autonomy and to challenge your roles and beliefs as a teacher and your relationship with your students:

  • Being so rich and varied, the website becomes an immense source of learning - isn’t it what we all want for our students, after all?
  • LearnEnglish offers a safe learning environment: students can try exercises as many times as they want, they are free to get answers wrong, they can practise pronunciation as many times they want with no one checking (and without the teacher having to interrupt to give opportunity for others to practise);
  • Students can decide when, where and what to study – every learner’s dream!
  • By encouraging students to learn outside the classroom you do not lose your teacher identity, you are reshaping it by adapting to changing circumstances;
  • When you create opportunities for students to learn without you, you show that you trust your students’ potential and you also trust yourself: that you have given the right and enough directions;
  • Lastly (teacher to teacher), with the heavy teaching loads we have, sometimes you secretly just wish someone else did part of your job…Don’t you?

Let me know what you think in the comments. :) 

Thank you for reading and see you next week!


Cândida


Credits: All images included in this post are screenshots of pages from the British Council's LearnEnglish website at https://learnenglish.britishcouncil.org/

Sunday, 13 February 2022

WebQuests

This week’s post will be about WebQuests!

WebQuests are a tool where students work collaboratively in a series of activities to complete a task by making use of information provided to them from the web. By doing this, students practise their language, critical thinking and collaboration skills.

WebQuests seem to be linked to the notion of Task Based Learning which is a method developed from the social constructivist theory of language learning where language is believed to be better learned through social interactions and collaboration.

A good example of what WebQuests are can be found in the original website at http://questgarden.com/. The design does not look very modern but unlike most current online teaching tools, it does not contain a lot of unnecessary information that can sometimes distract users. It is simple and easy to navigate, and I find this particularly practical for contexts where students – and teachers – are beginners in the use of technology. See the image below for an illustration.


QuestGarden home page


  •  How it works: task design
  1. It follows the general principles of teaching, where planning is the first step. Here, the teacher will define all aspects that would be included in a common lesson plan, such as defining the topic, objectives, considering students’ profile, materials and resources available, time, etc. Special attention should be paid to assess the availability of the resources needed and students’ literacy skills as the tool requires browsing the web for specific information. The teacher also needs to make sure the task can fit into the design/format of WebQuests.
  2. Think of a real word context where students would need to use language for and to find information to complete a specific task. It must be realistic and something your students will relate to.
  3. Design the task and the process. Set the goal of the task, the kind of information needed and where it is to be found, the roles students need to take to find the information in an efficient way and what they have to do with the information they find.
  4. Decide on how students will present (orally or written) their final product.
  5. Design an evaluation sheet with clear criteria that will be used in marking.


  • How it works: using the tool

You need to create an account on QuestGarden where you will get more information about WebQuests and learn how to create one. At this link you will find a sample WebQuest task, entitled Oh, the Possibilities!: Choosing an English Language Course Abroad.

 In this task students are asked to plan a trip for an immersion English course abroad, by completing a series of activities:

  • Decide on which city to travel to;
  • Assign roles and look for information accordingly (flights, accommodation, costs involved, etc);
  • Write a proposal including a detailed plan of activities and budgeting;
  • Present the proposal to the class and convince the audience to approve the plan.

I like the simple design of the site, with clear instructions on the left-hand side column where you can navigate through and get more details. I particularly like the Process part because it better illustrates how process shaped and collaborative WebQuests are.


Oh, the Possibilities WebQuest


The site has both Student and Teacher Page. However, apart from the Introduction, there is no information at all on the Teachers page.


Oh, the Possibilities WebQuest Teacher Page


Another aspect that does not sit well with me is the Introduction in the students page that looks more appropriate, in my opinion, to teachers. In fact, the same information is available on the Teachers’ page, as you can see in the previous picture, and I think a more student directed message should be added on the students page.


Oh, the Possibilities WebsQuest Student’s page


It seems that both users can access each other’s page. This is different from what we see in most learning platform today, where teachers have access to the students’ version and the opposite is not the case. I am not very sure whether this is good or bad, but I wonder if there is a specific reason for this and I would be interested to know what it is.

Another part I found interesting is the Evaluation section. Here we see information about how students will be evaluated in the task, and we can see that not only language skills per se are evaluated but other skills involved in accomplishing the task. I think it is an acknowledgement of the fact that language use is not only about using the right words and applying rules correctly, that there are others skills and it makes all the sense that those aspects are included in the assessment.


Oh, the Possibilities! WebQuest Evaluation Criteria


I hope you will agree with me that WebQuests are worth a try. They are not a new thing, but I find them very rich in the possibilities they offer to cater form different aspects of language learning and other skills associated to the process.

The advantages of WebQuests can be summed up as follows:  

  • User friendly
  • Process design
  • Explores higher order skills
  • Promotes collaboration
  • There is integration of skills

Some aspects - that I would not call drawbacks - that you should bear in mind are:

  • Web searching can mean internet costs.
  • One has to have a paid account to make the most of the website’s functionalities, which can be an issue in context where schools are low resourced, and teachers have low income.  

Thank you for reading and let us know what you think in the comments.


See you next week,

 Cândida


Mobile phone podcasts for listening practice

If you asked me, what is the area in my teaching that I wish I should be doing more than I have been doing, my answer would likely be the te...